In my last post, I showed off some photos of the wrap pants I made. Today I’m going to show you how to make your own!

Note: Please don’t use this tutorial for commercial purposes. I made the decision to post this tutorial despite the fact that I’m currently offering these pants for sale in my Etsy shop, http://Laupre.Etsy.com, because I love to share. If you like this tutorial, please take a moment to stop by my shop and have a look. Thanks!
These pants are the perfect solution for hot summer days. The slit sides allow for a cool breeze while still giving you plenty of coverage. For a long time I thought I couldn’t make myself a pair of pants. I struggled with a number of different patterns and could never manage to make anything I’d be willing to wear out of the house. Now that I’ve worked out how to make these, I never want to take mine off! In this tutorial I won’t be giving you many specific measurements, and you won’t need to calculate any formulas to get started. I use an organic, freeform way to get the right size and I’ll explain how I do it as we go.
Click more to read the entire post…
There are just a few supplies that you’ll need to make these pants:
Fabric: I used two yards for this tutorial. I cut the width of the fabric to fit the waist and cut the length to the length I wanted the pant.
Ribbon or Ties: Good quality grosgrain ribbon makes excellant ties and are a quick and easy way to do it. You can also make your own ties with lengths of fabric sewn into tubes or straps. You’ll need four pieces as long as you want then (mine are about an arm’s length).
Sewing supplies: Thread, Scissors, Sewing machine or needle, Iron
Step 1
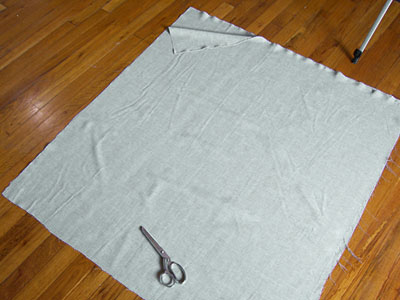
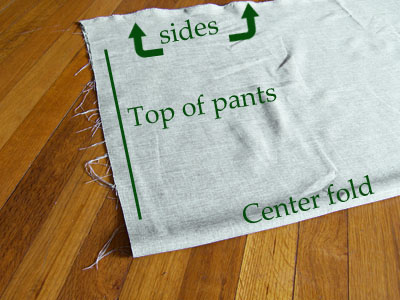
You’ll want two rectangles of fabric. They should be wide enough to wrap all the way around your waist with some overlap. (for those of you that need a measurement, an extra 12 inches over your waist measurement or so should do) It will need to be wide enough to cut out the crotch area and to make a hem at each end. I suggest going bigger than you think you’ll need the first time you try it. It’s really easy to make a larger hem or trim it down once it’s together if they’re too big. If you end up with pants that are too small, though, you can always add extra panels to the sides. They look great in a contrasting color! The rectangles should be the length you want them to hang plus enough for a hem on top and on the bottom.
Place right sides together and fold the rectangles together so that the sides of the pants are all together and the top and bottom of the pants are at opposite ends.
Step 2
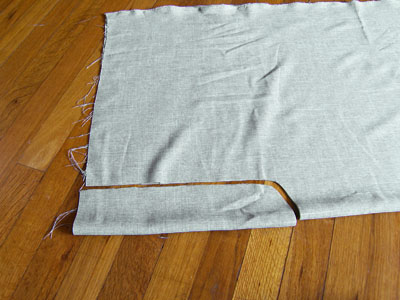
Cut out the crotch area. You’re going to cut a shape like a half of a U along the center fold. If you want an exact shape you can borrow a piece from a pants pattern and follow that line. Otherwise you should be able to wing it. Take a look at the curve on a regular pair of pants if you’re unsure. I use the width of my hand at the knuckles to gauge how far to cut in from the center fold and about about a hand and a half (wrist to fingertips wise) from the top of the pants. The deeper you cut from the top of the pants in this step, the higher you waistline will be. For a rough estimate, I’d say to make the cut about 4 inches wide and about 11 inches from the top of the pant. This measurement doesn’t have to be precise, the design of the pant is very simple!
When you unfold the rectangles you’ll see your U:

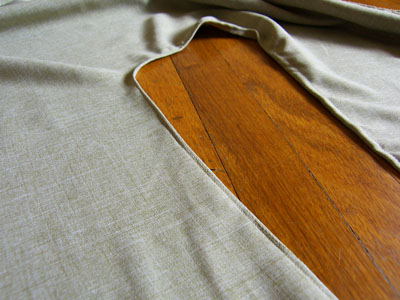
Make a curved seam along this U. This is the only curved seam you’ll have to worry about! Stitch it, serge it, bind it… however you like to finish it, just make sure it’s a nice strong seam. I like to top stitch it as well for extra strength
Step 3
Now you’ve got a giant pair of pants!
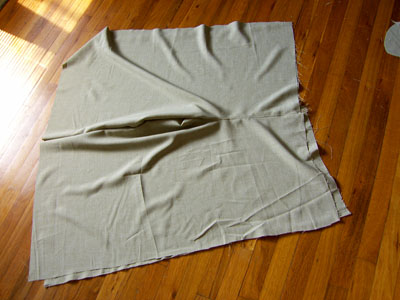
It’s time to hem all the rough edges. Yes, there are a lot of edges to hem. This is my least favorite activity because it’s just a bunch of straight lines, I suggest turning on some music and singing along so loudly that the neighbor’s dog starts to howl while you do it (or at least that works for me when I start to get bored). As a little tip, use your iron to press your hems well before you begin to sew! A good press will make it remarkably easier to get good straight lines for your hems. I usually do the sides first, then the bottom hem, and I’ll cover the waistband in the next step. In other words, hem all of the lengths of fabric that don’t have the crotch seam in them.

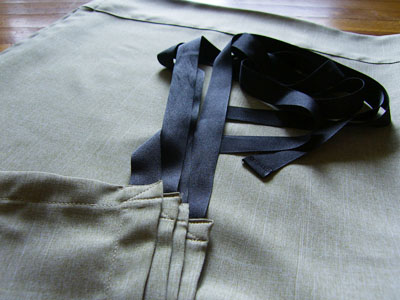
Step 4
All that is left to sew now is the waistband and add the ties. These are done together as one step. First, fold and press the hems for the two waistband sections (the two sides that have a seam in them.) Take your four ties and pin one to each end of the waistband, inside the fold.

Now stitch up the waistband along your hem. Be sure that your ties are sewn on securely. I like to use multiple rows of stitching. (If you’re using ribbon for your ties be sure that the free ends are finished either by hemming, tying a knot, or however you like.)

And now your pants are complete!
Wear them tied in front or tied in back and enjoy.


Just in case you missed it in my last post, here are the instructions on how to tie them on:


These are AWESOME. Saw them on Craftster, and I SO want to make a pair (as soon as I get home from gosh darned college and can get to my machine…xD). Quick question… Any particular sort of fabric the best for this? Just plain cotton? Or… Something else?
So cute! (and if I had any money I’d be in your etsy right now…xD WISH I had money… *sigh*, those thermal fingerless gloves are PERFECT for my sister!)
Comment by Elensule — June 29, 2008 @ 9:58 pm
i find that using a fabric that is wrinkle free is the best way to go.
Comment by Zatchmo Ratley — November 5, 2011 @ 12:04 pm
wow! thanks for that. i’ve been meaning to make wrap pants for months now. your tute is the best one so far.
Comment by cheryl — June 30, 2008 @ 6:51 am
Very nice pants! I think these will totally look great in linen/cotton, maybe even jersey…and they must be great for summer, since air can flow through the sides. Thanks for the tutorial!
Comment by Mirela — June 30, 2008 @ 7:56 pm
Thanks for the tip! Those pants look just awesome. I think I might even try modifying them so they’re high-waisted. Maybe?
Comment by melissapher — July 1, 2008 @ 1:03 am
Definitely adding these to the “things to try” file! They look so simple, yet stylish. Thanks for the great explanation and accompanying photos.
Comment by Lisa Clarke — July 1, 2008 @ 1:57 am
I love your tutorial!!! I’ve been looking for a tutorial for this pants for ages, but I never understand them! Yours is great!!!!!
I can’t wait to give it a try!
Comment by Alejandra — July 1, 2008 @ 2:32 am
oh, did this come from Make it with Mademoiselle? I’ve made many of these over the years, and people always “ooh!” and “ah” about them!
Comment by sarahj — July 1, 2008 @ 4:48 am
cool! now i’ll take my sawing machine out and do some!
Comment by Iris Mishly — July 1, 2008 @ 6:33 am
Wow! Those pants are awesome, and your tutorial is great! I can’t wait to try to stitch up a pair!
Comment by knittinnoodlin — July 1, 2008 @ 10:03 am
These are so cute; I’m definitely adding them to my file of patterns to try.
Comment by Kimberly — July 1, 2008 @ 2:01 pm
Wonderfully outlined! I’ve been making similar pants for a while now and I have to say you’re are the clearest instructions to follow. I LOVE these pants, if I have my way I’ll soon get rid of my jeans in favor of these.
One little word of caution though? The first couple of times getting to the bathroom can be entertaining. Whichever way they get tied, make sure to hold onto the back fabric AND the ties. Walking around all day after dropping them into the privy is’nt much fun!
Comment by Jenna — July 1, 2008 @ 2:17 pm
Great tutorial – I had a pair of these pants in the now too-distant past.
What I remember that I didn’t like about them was the fabric was too heavy making them feel like I walk walking through the wind with sails. A lighter fabreic would make them much easier to wear – and to keep on!
Thanks again!
Comment by KnittenJen — July 1, 2008 @ 3:04 pm
That is so clever! I am not that great of a seamstress, but I would love to try this idea. Thanks for the tutorial!
Comment by brittany marie — July 1, 2008 @ 4:03 pm
Can’t wait to make myself a pair – those are fabulous!!! :)K
Comment by Kim — July 1, 2008 @ 7:07 pm
This tute is great! I’ve already made 3 pair and I have another in denim in the works!!
Great job!
Comment by Deana — July 1, 2008 @ 9:43 pm
Thank you soooo much for this tutorial! I’ve wanted a pair of these for such a long time. Just finished my first pair and I can’t wait to make another! Thanks again!
Comment by kelly — July 2, 2008 @ 2:51 am
I love them! They are so awesome, I can’t wait to give it a try. Thanks so much for sharing your tutorial, that’s super sweet. =o)
Comment by Queenie — July 2, 2008 @ 4:22 am
I’m going to give these a go this weekend, thank you so much!
Comment by Nellyphant — July 4, 2008 @ 6:58 pm
These are great! I saw them this morning, and I’m wearing my first pair now!!! Heating up the iron to work on my second pair! Thanks so much for the great tutorial.
I had thought that they would open up on the sides, exposing my large legs, but even sitting in the most un-ladylike fashion, they stay modestly wrapped! I love them!!!
Comment by Jolene — July 4, 2008 @ 8:40 pm
Great tutorial!
Just finished a pair from an old sarong I had, I just folded it in half. It worked great as the sides were already finished and I only had to hem the top, so it was even faster than your example. I ended up leaving the fringy side down to be the bottom hem and so far I’m liking that too. I mean to wear them mainly around the house, so if I get sick of the fringe, I can just cut ’em off. I used wide twill tape that I already had on hand for the ties.
I really like the ones you show in your “how to put them on” shots (which helped me alot, thanks) – the rayon sarong was a bit slippery to sew, and I like the look of your cotton ones. Lots of room for embellishment, I’m thinking… Anyhow, these are so comfy, I will be making more! Thanks for sharing!
Comment by GreenMyEyes — July 5, 2008 @ 8:23 am
[…] Easy Breezy Wrap Pants Tutorial « Laupre (tags: clothes clothing craft crafts diy howto pants pattern sewing tutorial trousers wrap) […]
Pingback by links for 2008-07-06 « The Adventures of Geekgirl — July 6, 2008 @ 4:47 am
awesome, thank you! I was just pondering this weekend how I was going to cook up a pair of these and now it’s going to be so much easier!
Comment by Holly — July 7, 2008 @ 10:19 pm
Okay. I’m addicted. I’ve made five pairs of these.
I LOVE THEM SO MUCH!
Comment by Jolene — July 9, 2008 @ 10:52 pm
wow!!!!!!! those are awesome!!!!!!! i am totally going to try to make some once i get my machine back (is in the shop right now). one of my music teachers always wears wrap pants and i always liked how they looked. well thank you sooo much for the tut!!!!!!!!!!
Comment by Ahllie — July 10, 2008 @ 6:00 pm
Great tutorial and thanks for sharing it. I am going to try to give these a go!
Comment by thelandofka — July 10, 2008 @ 7:04 pm
[…] Sanırım bunlara Japon balıkçı pantolonu(Türkçe’ye çevirince) da diyorlar. Orijinali Laupre’nin blogunda var. Ben de nasıl yaptığımı anlatmaya […]
Pingback by plaj pantolonu — July 11, 2008 @ 1:47 pm
see my groovy pants at http://www.fionaswampington.blogspot.com and I linked to you for the tutorial, best I’ve seen. Thanks!
Paige
Comment by paige — July 14, 2008 @ 4:41 pm
I’m making my second pair of these now and I am planning big, big things. To date, this is the only sewing project I haven’t effed up. Thanks for this tutorial!
Comment by fuschiagroan — July 18, 2008 @ 12:53 am
Wonderful tutorial, great pants! You Rock for sharing – thanks!
Comment by beingv — July 23, 2008 @ 2:00 pm
Hey, just made these pants in a bout 30 minutes. Thanks so much for the tutorial. I love them. One comment: maybe I did something wrong, but it seems that you would want 12 inches LESS than your waist measurement instead of MORE, like it is stated. Better to start out too big and work down though. Thanks!
Reply from LauPre:
I’m so glad you liked the tutorial! Just to clarify, the extra inches are added to waist measurement to account for the fabric cut away for the crotch and the side seams. If you start with the fabric width at less than your waist measurement they won’t come all the way around once they’re finished. 12 inches might be too much, depending on your measurements, the width of the hems at the sides, and how much you cut for the crotch area, but like you said, it’s better to have too much than not enough to work with.
Thanks for taking the time to comment!
LauPre
Comment by Sallie — July 28, 2008 @ 2:19 am
Wow, thank you! I have been looking everywhere for a tutorial and this is great! Thanks a lot!
Comment by rebecca — July 31, 2008 @ 10:25 am
you know what’s funny Courtney. it’s about midnight-thirty here and I’m seriously contemplating getting out of bed to start a pair now. I think I have some old fabric that was going to be a cloak. and I really think I can make these!!! I haven’t properly finnished a project yet. still teaching myself…
wish me luck! and cross your fingers I don’t wake the hubby! he still has a job. at least one of us does right? anyway, that’s another story…
enough out of me though. I do believe it’s time to sew!
Comment by Crystal — October 5, 2009 @ 10:38 pm
I saw this at midnight. It’s not 3am and I just finished my first pair. Love them! By the way…ths was my first sewing project EVER! Thanks!!!
Comment by Courtney — August 12, 2008 @ 7:47 am
I had a pair of these back in the 70’s. Glad to see them back! They were the most comfortable pair of pants I had!
Comment by Morgen — August 14, 2008 @ 6:52 pm
Thanks! I’ve always wanted to make a pair, now I have the power!
Comment by Kathryn — August 15, 2008 @ 7:40 pm
Hi Laure,
I found your tutorial for wrap pants via whipup. I can’t wait to try it. It looks fantastic.
I have a pretty crappy broadband connection, so the first time I downloaded the tutorial, not all the pictures downloaded – some just showed a question mark icon – i wasn’t sure whether the files were in different formats or what was going on.
Anyway when I tried tonight, they came up fine, so I decided to be on the safe side and save the tute as a pdf file, which means it stays forever as you meant it to.
I don’t know how easy or hard it is to create pdfs on a PC – I’m a mac user and it’s dead easy.
If you’d like me to send it to you, let me know your email address.
cheers, and thanks
Liz
Comment by liz — August 18, 2008 @ 1:04 pm
Thanks for posting this tutorial. My sister would love a pair of these pants and I would definately love to make these for myself. Thank you for doing it 🙂
Comment by Kat — August 18, 2008 @ 10:13 pm
I love these pants! My only question is, what do you do if you need to pee in public?
Comment by Bec (Bad Mummy) — August 19, 2008 @ 2:01 pm
Oh my I love these and its 10:30 at night and I’m preparing to head towards my stash and start a pair! God bless the internet!!!
Comment by hellesbelles86 — August 21, 2008 @ 3:27 am
[…] boggling 200 new posts so it took me a while to find one that caught my attention. Then I found it. Wrap pants. All the comments on the designer’s blog talked about how easy they were to make so how could […]
Pingback by What I did last night/early this morning and other thoughts « Hellesbelles Misconceptions on Life — August 22, 2008 @ 4:49 am
[…] contributes her wrap pants tutorial to the world, much to the joy of cozy pants […]
Pingback by Paisley Cupcakes » Blog Archive » That’s a Wrap! — August 22, 2008 @ 12:52 pm
Thank you so much for posting such a great tutorial! I got the fabric this morning and am trying this after the kids are in bed! Can’t wait!
Comment by Kelli@GohnCrazy — August 25, 2008 @ 7:49 pm
I made a pair of 3/4 length last night and will make a pair out of a sarong I don’t wear anymore tonight… thank so much!!!
Comment by April — August 26, 2008 @ 1:44 pm
Thank you for this wonderful tutorial. I’ve always wondered, how do you put such pants on!?!?!? 🙂 Now i know and i’m totally inlove with these pants. I made myself a pair and wore them on our rare hot summerdays. Thanks again. If you like, you can check my pants on my blog:
http://www.kuutydrukv.blogspot.com
Comment by kuutydruk — September 3, 2008 @ 1:16 pm
I just made my first pair of these. wow. love them. i made mine out of a tapestry i found on sale at target. i think i might make like…. 50 more. thanks for the tute!
Comment by Amanda — September 15, 2008 @ 8:50 pm
Thanks for the tutorial! I wanted to share this with you because I hope you’ll get some enjoyment out of helping me out in an unexpected way 🙂
I sort of made a pair last night out of microsuede to test an idea. I was thinking I could make a pair as coveralls for running the chainsaw, weed whacking, etc. There seems to be more freedom of movement and protection than with aprons and you don’t have to take your boots off to get them on/off like with coveralls. Not to mention that I don’t have to look around for them in my size or order them from a sketchy internet company, and my wife, my son, or anyone else who wasn’t the same size as me can borrow them.
It was easy as pie, because I didn’t hem anything and I didn’t sew the “u” part the whole way, just a little at the top of each side to hold the waistband together so it would have a fly. You could probably use a grommet kit and a string to hold the two legs together at the waistband and all you would need to do is sew the ties on. That way if one side got a hole or got chewed by the dog or something you could just make another half and tie it together instead of replacing the whole pair.
It worked pretty well, I think! Well enough to try it with some real leather.
Thanks for the idea!
Comment by Dan — September 20, 2008 @ 7:49 am
[…] eingedeckt habe, jetzt hat mich auch noch das Nähfieber gepackt. Los gings mit dieser Wickelhose: Easy Breezy Wrap Pants. Meine Version ist aus Ditte und auch schon fertig. Fotos gibts aber erst, wenn mal wieder die […]
Pingback by Stricken & Spinnen: Annkaris Blog » Blog Archiv » Nur nicht den Faden verlieren — September 22, 2008 @ 5:10 am
Thank you very much!!! That’s all I can say! 🙂
Comment by Ana — September 25, 2008 @ 8:35 am
[…] are way cool! Tute here. Tags: Add new tag, pants This entry was posted on Tuesday, September 30th, 2008 at 10:08 am […]
Pingback by carrotflowers » Blog Archive » tutorial for wrap pants — September 30, 2008 @ 8:08 am
Do you by chance have a picture of finished pants lying flat. I’m having a hard time picturing them when they are done before they are on your body. It would help a lot!
Comment by mandie — October 13, 2008 @ 3:31 am
They just look like two rectangles of fabric, right sides together, with the top edge showing a U cut out and ties coming out of the ends. Couldn’t be simpler!
———
| U |
| |
—–
Comment by Lithorne — May 7, 2009 @ 6:06 pm
[…] since I saw this wrap pants tutorial on Laupre, I’ve wanted to try them. I kept the tutorial in mind when I went fabric/pattern shopping […]
Pingback by Wrap Up | Diva Knitting — October 22, 2008 @ 10:23 am
Ah, I took a photot of a pair of trousers using the same idea this summer. They were called Portugese Fishermans Trousers I think. The only difference were that in the pair I photographed the back were about one inch higher.
Comment by Mitz — October 24, 2008 @ 9:52 am
I am in LOVE with you and your pants!! I’ve had them on my favorites on Etsy for awhile, waiting for some $$ to send your way…. but then found this! I would have forever been too lazy to figure out the technique for myself. Since I saw it this morning I’ve made 2 pairs and loooooooooooove them! THANK YOU!!
Being a seller and sewer myself, and actually knowing of and wanting your pants before I discovered your wonderful tutorial, I feel like maybe I may have lost you some money in making my own- but I admire so much that you are willing to share all this with us and would really like to make you something in “return”…. let me know if you are interested 🙂 you can see stuff made (in sold items) at sinnervip.etsy.com or thepinkplaidsheep.etsy.com (I swear that’s not a plug on my part for anyone but you!).
Thanks so much again!!
Kari
Comment by Kari B. — November 3, 2008 @ 11:05 pm
Absolutely kick ass awesome design and tutorial. Thank you so much for sharing this. You just made my local fabric store richer with all the fabric I’m going to buy to make these now!
Comment by Shelley Noble — November 15, 2008 @ 1:44 am
[…] Easy Breezy Wrap Pants Tutorial « Laupre – […]
Pingback by wonderment » Blog Archive » Bookmarks for December 1st from 16:33 to 18:35 — December 1, 2008 @ 1:02 pm
Hooray! After buggering up a perfectly good yard of fabric on a bought shirt pattern, how DELIGHTED am I to be a third of the way through these free-cuttin’, free-sewin’ marvels. Taking a dinner break, then back to the pants with me!!!
Thank you SO much. These will be awesome for summer, and forgiving and accomodating of the weightloss (post baby) plan.
Comment by alison — December 6, 2008 @ 7:13 pm
I’ve been sitting here cracking my head trying to figure out how these pants are supposed to come together, and i know you have pictures there to explain how to tie them on and how to make the patterns but i still dont understand at all how they are supposed to work!
The u shaped thing doesn’t make much sense to me at all, if that is the crotch it just seems way too small for me, and the picture where it says “Now you have a huge pair of pants” how did that come together?
I just really can’t seem to understand the tutorial at all, and it’s too bad because i really like the pants -sigh-
Comment by daer0n — December 30, 2008 @ 11:36 am
Hi,
Yeah, the U shaped part is the line for the crotch, and goes between your legs from front to back. To get from the photos in step two, after you’ve sewn along the U shape, to the photo in step three, it’s just a matter of opening up the fabric. I know it’s kind of a hard concept to visualize, but it’s kind of like each of the large rectangles wraps around one of your legs, and they’re just attached at the U shaped part. Once you sew that one seam, the rest is all just hemming and attaching the ties.
You could take a look at a pair of pants that you already have an imagine what it would look like if you cut straight down the outside side seams from the top to the bottom.
I hope my explanation makes this a little clearer, let me know if you need more explanation, because honestly it’s really simple once you get it.
Comment by laupre — December 30, 2008 @ 7:06 pm
Hi Laupre,
Thank you so much for your explanation, it totally makes sense now!
I am planning on making myself a pair, i really love the design 🙂
Thanks again!
Comment by daer0n — January 5, 2009 @ 10:04 am
I was wrestling with the idea of finding a pattern to make these pants in my size..18…. its not sold everywhere…… and a new idea for me. I happen to search for an instructional..and found yours.
thanks for showing us, you saved me me the pain of searching pattern books and then the money for the pattern….jean
Comment by jean selman — January 7, 2009 @ 3:08 pm
Wrap Pants, elastic waist…..I have an idea for a more form fitting wrap pants pattern, instead of a straight sewn waistline and tie straps, how about a wide elastic stitched around each side , front and back , allowing a more shapely waistline and more form fitting.By connecting the elastic ends with a hook a size of your choice, both front and back , like on a bra RATHER than ties,This would prevent the sometimes uncomfortable “tie ” tigthness and make the wrap pants a little more comfortable around the weaist line …Anyone thought of this yet? …jean
Comment by jean selman — January 7, 2009 @ 3:47 pm
Hello There: Thank you so much for posting this tutorial. I learned of it on the Burda Style site where one of the members made a stunning pair in light blue silk. Anyway, I also gave up on sewing my own pants years ago. No matter how thin I get, it just doesn’t work out! So, I am very eager to try these, and I appreciate your generosity in sharing.
Comment by Carey — January 14, 2009 @ 8:17 pm
Love the pants and the pattern and thanks so much for sharing the wrap pant love!
Comment by luxotica — March 3, 2009 @ 5:45 pm
I’m gunna make a pair for my daughter…. Whee… hee hee hee, she doesn’t like skirts.
Comment by Harmony — March 20, 2009 @ 6:10 am
oh my gosh these pants are amazing!!!!!!!!! thank you so much for sharing the tutorial!!!!
Comment by josie — March 31, 2009 @ 1:30 pm
I actually had to laugh as I read this tutorial. You sew very much the same way I do. About a hand span here and a palms worth there! I think I’ll give these pants a go. They look like they would be very comfortable to wear. I teach art in a primary school so I like to wear something that is both comfortable and a bit different.
Comment by dette — April 19, 2009 @ 6:18 pm
You have no idea how perfect this is for me. My weight has been fluctuating recently and I refuse to buy a larger size (my own issues) while I am trying to lose weight. I love that these are adjustable and could be cut down if I lose as much weight as I am hoping to.
Thank you so much.
Comment by Ronda — April 29, 2009 @ 9:48 am
I am 100% in love!
Comment by Anne — April 30, 2009 @ 4:05 pm
You have a seriously AWESOME talent!!! I’ve been tring to figure out how those pants work / fit together for a very long while now!!! LOL !!! I checked out some of the items on your site … fabulous looking stuff (unfortunitely for me most of your stuff is totally out of my price range;) ) I liked the “military green ruffle bustle skirt and corset laced halter set” best!!!
But really you have a SERIOUSLY AWESOME TALENT !!! 😉 😉 😉
Comment by Kristal — May 10, 2009 @ 11:18 am
see my post oct 5th 2009!!!
Comment by Crystal — October 5, 2009 @ 10:29 pm
Great pants! Love the easy breezy fit. I have one question – how the heck do I go to the bathroom wearing these?! 🙂
Comment by Tara — May 12, 2009 @ 3:50 pm
[…] So that is all for the weekend post and some of yesterday’s and yep its late as my summer class have been taking up some time as well as having to make other things like the wrap pants i finished make yesterday following a tutorial. […]
Pingback by Writings on Tings » Weekend of Creation — May 27, 2009 @ 4:51 pm
I LOVE these pants! I just whipped up a pair from a set of repurposed curtains I found at goodwill. The best part – I didn’t have to hem!! They are so comfy and will be absolutely perfect for this summer. Thank you so much for sharing your tutorial!
Comment by Brenda — May 27, 2009 @ 7:14 pm
[…] Laupre shares a tutorial showing how to make these cool wrap-around pants. Perfect for summertime! Go to the tutorial. […]
Pingback by Tutorial: Easy wrap-around pants · Sewing @ CraftGossip — June 3, 2009 @ 7:24 pm
these are awesome! i’ve been making things for everyone but me (was just thinking about this today) so these i will make for me…tomorrow.
thank you for sharing!
i’m going to give the elastic idea a try as well…
Comment by brandi — June 3, 2009 @ 8:33 pm
Wow! Just Wow! I must try a pair!
you are so very sweet to share with us! Thanks!
Comment by Becky — June 4, 2009 @ 1:19 pm
I had a pattern like this back in the 70s, and they were comfy. I sometimes wish I still had that pattern…and thanks to your tutorial, I can make a new pair! YAY! your pattern is more simple, too.
Comment by Mary G — June 4, 2009 @ 10:18 pm
[…] LauPre’s Easy Breezy Wrap Pant […]
Pingback by Must Make Monday – It’s Summer, Tutes! « The Handmade Experiment — June 15, 2009 @ 9:29 am
This is great! I’ve posted a link to it in a summer tutorial post on my blog, The Handmade Experiment. Check it out at http://heart-of-light.blogspot.com/2009/06/ruffly-headband-tutorial.html
Thanks and have a wonderful summer!
Emily
Comment by emilyflippinmaruna — June 15, 2009 @ 10:41 am
I looove these pants! Thanks so much for the instructions and photos. I made two pairs, in salmon coloured linen with embroidered detail at the bottom. The embroidery allowed me to not make a seam for the bottom , which is always fun.
I made my second pair about 6 inches smaller around, which lets the leg slits open about to my knee when I walk.
Thanks!!!
Comment by Becca — June 16, 2009 @ 2:59 pm
Thanks so much. I saw dancers wearing wrap pants and decided to make myself a pair. I’d done it several years ago and forgotten how.
And yes, I visited your etsy.com shop. You do wonderful work.
Comment by Afi — June 21, 2009 @ 3:51 pm
Awesome! Thanks so much for posting this tutorial!
Comment by MommaJ — July 12, 2009 @ 1:39 pm
Super easy and good pattern thanks made my first pair to day and it will be more !!
Comment by trollmamma — July 29, 2009 @ 2:27 pm
I have wanted to make these for a LONG time. Thanks for the very easy to follow steps. 🙂
Comment by Rachel — August 15, 2009 @ 9:00 am
just ran across this on another blog. i have a pair of these made from recycled saris and LOVE that you’ve put this up so that i can make my own! thanks!
Comment by infamousqbert — September 14, 2009 @ 1:45 pm
great tutorial! I’m so glad I found this and u plan to make my own finally.
here’s a helpful hint on tying them:
If you’re a guy, tie them AT the front FIRST. if your a girl, tie them AT the back FIRST.
if you do this it makes using the ladies/mens room MUCH easier. (unless men must do more than number one of course.)
I learned that from this guy when I bought my first pair at a rennasiance fair.
happy sewing!
Comment by Crystal — October 5, 2009 @ 10:23 pm
I* plan to
sry I’m typing on my phone!!
Comment by Crystal — October 5, 2009 @ 10:25 pm
This is a great tutorial. I saw this on another blog and it linked to this post. This is much more in depth. Thanks!
Comment by Watch UFC 109 Online — January 5, 2010 @ 9:48 pm
I wish I had thought to look for these BEFORE my knee surgery. They would have been a huge help.
Comment by Constance — January 19, 2010 @ 10:52 am
Thanks for posting this tutorial! I love these kind of pants and your instructions are nice and easy.
Comment by Erin — February 7, 2010 @ 8:00 am
I want a pair in fleece . I have off white and black. I think I will have two layers. no hemming necessary. good with black tights.
I’m also working with sarongs to tie over black fleece tights and uggs. Sarongs can be doubled so it is above the knee or more.
I am looking for clothing that is very loose. It gives me privacy yet allows me to expose my body in a covered yet sensuous way.
Thats better at 58. Thanks for the pattern.
Comment by Victoria — February 11, 2010 @ 11:27 am
Years ago, in the late 1960s, I used to make these pants but here is the difference: I used the full width of the fabric for each “side” ( ie 45″ for the front and for the back), I used elastic in the waist band, and made them long. The result was a very comfortable flowing pair of lounge pants that paired perfectly with a T-shirt.
Comment by Victoria Gillis — March 21, 2010 @ 8:40 pm
Thank you for posting this! I needed a pair for a quick costume and this is immensely helpful!!
Comment by Michelle — March 27, 2010 @ 8:52 pm
I have been wanting a pair of these for a long time but never could find a pattern and/or instructions.
I appreciate what you’ve provided. No, I don’t intend to use them for profit, only to wow my friends who are
always looking to see what cool clothes I’ve discovered…again. Many thanks!
Comment by Meridien — April 11, 2010 @ 7:26 pm
Thanks, Laupre, for posting this.
I really needed a pair of pants that one didn’t need to stick their feet through for a doll of mine, and they’ve come out great, I’ve also lined both pairs of I’ve made. I’ve got this pair that I made following the pattern mostly (used buttons later on the front to hold it shut): http://img.photobucket.com/albums/v457/mithra_taque/Dolls/James_Hook.jpg
And this pair, which I made more recently, where I shortened the sides in the end and sealed them up with zippers: http://img.photobucket.com/albums/v457/mithra_taque/Dolls/hill.jpg
Comment by IceMutt — May 1, 2010 @ 7:54 am
OMG!!! I have been wanting a pair of these for soooo long! I have seen other patterns, but your tutorial is the best. It makes sense out of the other patterns (and I don’t want to pay $9.00 at the store for a pattern). Thank you so much!
Comment by Julie — May 6, 2010 @ 12:40 pm
Bless you forever – I can’t find hese pants on the market for my size- no details – and have been longing to find out how to make them. I just stumbled on your site and I thank you from my very bottom.
Judy B.
Greece
Comment by Judy B. — June 6, 2010 @ 8:19 am
[…] Indietutes, Crafty Tutorials (who make them look almost sexy, which they don’t on me), or Laupre, who all have instructions and photos for how to make and wear the things. You can make them in […]
Pingback by Wrap Shorts! (a tutorial) « It's Not Easy Being Green — June 7, 2010 @ 5:09 pm
Sitting at the PC while wearing the pair I finished just a few minutes ago.. spent all day on ’em, but probably less than an hour of straight work (I get distracted easily).
I.. love.. these.. pants. Thank you so much!
Comment by Lydia — July 10, 2010 @ 3:32 pm
I know this was posted more than 2 years ago but I just found the site and made my first pair of wrap pants using the tutorial.
I wanted wide ties of the fabric but realized that having 4 self ties would be bulky so I used ribbon on the side you tie first since it is covered by the second side.
I think next time I will use elastic for the under side which will make it easier to get in and out of.
I love the pants, I love the site.
elin
Comment by Elin Whitney-Smith — July 19, 2010 @ 4:49 pm
Awesome!!! NEver seen anything like these before. I’m getting tired of dresses and skirts. I broke my ankle a month ago and my usual pants don’t fit over the cast. So excited to try these out!
Comment by Janelle Southern — July 20, 2010 @ 8:38 pm
Thanks I can’t wait to make these. I love confort
Comment by Barbaa — July 21, 2010 @ 9:06 am
Wow! These are great!
Comment by Margaret — July 21, 2010 @ 9:25 am
Wow!Thanks! I’ve looked for a pattern for these.
Comment by Margaret — July 21, 2010 @ 9:26 am
Great tutorial. My mother made a pair of these back in the late 60’s or early 70’s from a commercial pattern. The print she used would probably still look good today. She loved them. I remember looking at the construction and making a pair for one of my dolls. In fact, recently I was thinking about making a pair for me.
Comment by superstitches — July 21, 2010 @ 7:50 pm
I am so making some of these than k you so ,much
Comment by britt — July 24, 2010 @ 11:22 am
Nice wrap pants! Very practical and easy to make. Would love to post a reference to this article so my readers can check it out!
Comment by Mens Accessories — August 6, 2010 @ 2:49 am
[…] pants! Helena showed us how from an internet tutorial she’d read, I’m guessing it was this one. These turned out cute enough to actually even wear outside the house! At least, I wore them to the […]
Pingback by Cyn Makes Stuff : Pants Pants Pants (and Shorts) — August 8, 2010 @ 10:42 pm
Awesome content! Thank you!
gilbert realtor
Comment by chandler realtor — August 24, 2010 @ 2:06 pm
Nice useful article keep post like this.. Thanks for sharing this info.
My Blog
Comment by AdhiSesha — August 25, 2010 @ 11:44 am
I have a lot of weight to lose and I’ve been hesitant to buy/make anything knowing they won’t fit in a couple months. These are the perfect solution! Thanks!
Comment by Ashleigh — August 30, 2010 @ 2:31 pm
I love these pants! But I am confused about how and where the front and back pieces are attached…
Comment by carrie — September 26, 2010 @ 10:41 am
Love the pants, very original!
Comment by Sewing Supplies — November 7, 2010 @ 12:25 pm
THANK YOU! So excited, I can’t wait to make some. I saw a girl at a dance wearing long pair of these and immediately fell in love with the way they looked in motion–have spent the ensuing three years trying to find a pair of trousers similar! If I’d known they were this easy to make I’d have three pairs by now!
Comment by Suzannah — November 8, 2010 @ 12:56 am
You are an absolute angel posting this, I so desperately need these and can’t afford a pattern at the moment xxxxxxx
Comment by miss prudence — November 9, 2010 @ 12:10 am
This was a great help. I have been reading it and it just confuses me when I pick up the scissors. Now I can make my pants for a costume for Dragon Con. Thanks a bunch!
Comment by Erin Keahey — February 10, 2011 @ 9:44 am
[…] Easy Wrap Pants Tutorial […]
Pingback by Free Pants Patterns — February 15, 2011 @ 5:25 am
[…] Pants – failure I found this neat idea on a blog called Laupre. It’s like a wrap-around skirt, only pants! I found a piece of material in my stash that was […]
Pingback by Wrap Pants – failure « Faithful Stewards — April 15, 2011 @ 7:13 pm
I am happy to see that so many people (including a very creative man who is planning to do this in leather) have been introduced to these pants through your efforts.
However, as my father used to say, “There are few new ideas, just lots of new people.”
I’m in my late sixties now and these pants were all the rage 50 years ago among us “Flower Children” not to mention that they are traditional patterns for many Asian cultures. So, I don’t get how you can say they are YOURS and ask people not to copy them for sale. Many American pattern companies have this exact pattern and there are Asian factories making these in the tens of thousands right now. I believe that this “pattern” is really in the public domain worldwide.
This doesn’t make you less awesome for sharing with your tutorial.
Comment by theonlysuz — April 22, 2011 @ 5:51 am
wow…thanks…off to try…
Comment by lisa — May 24, 2011 @ 7:26 am
Yay!!! This is the most perfectly presented wrap pant pattern I have ever seen 🙂
Comment by consciousnesscultivator — June 15, 2011 @ 4:26 pm
WOW!! Suddenly interested in sewing in my forties,actually fluned it in H.S. Love the tutorial.Can’t wait to make them. Seem to recall my sister having a pair like these in the 70’s which I loved but was to small to borrow them. She hated it when i touched her stuff anyway,can’t wait to have a pair of my own. Maybe find some cool vintage material!!!
Comment by MeMe 2 — July 2, 2011 @ 5:29 pm
I have a pair that I don’t even know where I got- but I’ve been looking to duplicate them FOREVER!! I didn’t see anything I could purchase on your etsy store as a way to say thanks- but I will paint you a silk scarf- because this deserves a special THANK YOU!! I assume you can contact me with my email below, but just in case not, go to my website http://www.moonwhispers.com to let me know what you want!
I have a sari I’ve been wanting to make these with- so now I have next weekend’s project! Thanks again, Kim
Comment by Kimberly — August 9, 2011 @ 7:04 am
Excelente tutorial, está entre mis trabajos a hacer
Gracias por compartirlo
anny
Comment by anny — August 30, 2011 @ 3:26 pm
wore these in the early 1970’s and am SO excited to find your post to make them!!! I will be making a FEW pair to wear, as they are so comfortable!
Comment by Beverly Scarf — October 21, 2011 @ 4:57 am
Thanks for the Tute!!! Just made myself a pair from old fabric I had lying around. Next time I’ll be buying something nice and soft against the skin 🙂 I’m not much of a sewer and have no patience, but these were so quick and easy 🙂
Comment by Julie — December 15, 2011 @ 3:51 am
My mom made these pants for me in 1974/1975…..I loved them!!!! thanks for the instructions
Comment by Beverly Scarf — January 10, 2012 @ 7:40 am
just made my first pair following your instructions! I used my worst skirt (print too big, fabric not flowy enough and too much fabric!) Now the skirt is a pair of wrap pants and possibly my favorite thing in my closet! I can’t wait to wear them!
Comment by glosp — March 11, 2013 @ 11:06 pm