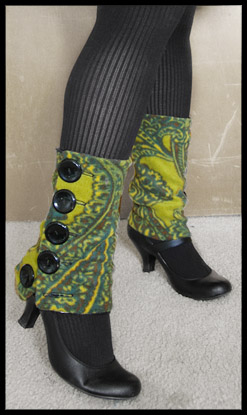
With Spring right around the corner I’ve been eying my favorite skirts and dresses and looking forward to getting a chance to wear them comfortably. I whipped these little legwarmers up to help me a get a headstart until the temperatures come up a little more. I thought I’d take photos to share so you can make your own. They’re really easy! You can make yourself a pair in an hour and wear them out tonight.
Due to high demand, I’ve made up another pair now available in my Etsy shop . Or place a custom order to choose your own colors, size, and height!
Step 1

Gather your supplies. This project only requires a few supplies.
1.Fleece- This is a good use for scraps since the pieces are pretty small. You’ll just need two pieces as wide around as your calf and 10 inches tall
2.Lining Fabric- Used to give stability to the buttonholes and buttons. I used cotton quilting fabric I had in my stash. You’ll need a piece 12 inches wide and 10 inches tall.
3. Buttons- 10 buttons 1inch to 1.5 inches across
Step 2

Cut out your pieces. You won’t need a pattern, but you should use a ruler or tape measure. First measure around your calf about as high up as you want the warmer to go. This will be your width for the fleece. Cut out two pieces of the fleece 10 inches tall and as wide as your calf measurement, making sure that there is plenty of stretch width-wise. Since there will be overlap for the buttons if the fleece doesn’t stretch this way the warmers will be too small . Cut four pieces of lining fabric 3 inches wide and 10 inches tall.
Step 3

Iron a small hem along one long edge of each of the lining pieces.
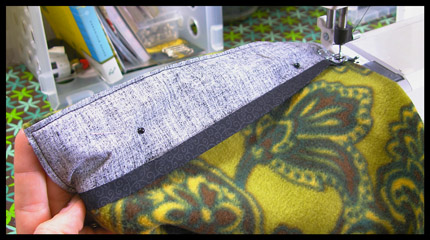
With right sides together, sew a lining piece to each 10inch side of your fleece. Sew just around the three sides that have raw edges. The sides that you ironed will be facing in to the center. I find it to be much easier to sew with the lining layer facing up and the fleece down on the feeddogs. It prevents the fleece from stretching out as you sew.

Step 4
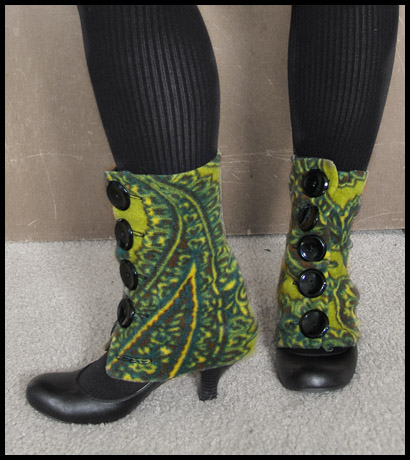
With your lining layer up, mark five button holes on one side of each warmer. Space them about two inches apart. Sew your buttonholes according to your machine’s directions. Snip your buttonholes open, mark and sew on your buttons.


that’s it!
you’re done!


I love, love, love these! The style, the fabric, the buttons…everything is perfect! 🙂
Comment by sweets4ever — February 28, 2008 @ 8:02 pm
SO cute! Very steampunk ♥! I am totally going to go digging through the fleece remnants next time I’m at the shop. ♥
Thanks so much for the easy to understand tutorial!
Comment by startwithabang — February 29, 2008 @ 1:37 pm
Very cute! Thanks for the tutorial, I really like these!
Comment by Miss J — February 29, 2008 @ 6:01 pm
I love these!
Comment by m — March 1, 2008 @ 12:42 am
Love this idea! Now I just wish I had a sewing machine… Woe. 😉 I may have to buy one from you, what material selection do you have?
Comment by Sarah P. — March 1, 2008 @ 4:14 am
These are adorable! I made a pair last night following your tutorial (which was very nicely put together) and I love them! Now I just need a place to wear them. 🙂 Thanks so much.
Comment by Addie — March 1, 2008 @ 5:32 pm
Those are so incredibly adorable! I would love a pair but I am an extremely busy person. I would be willing to pay for a pair to be made for me. please get back to me if you would be interested
Comment by Amber Humphrey — March 10, 2008 @ 6:47 pm
[…] you need it, LauPre has a more detailed tutorial for buttoned legwarmers on her blog… and whether you visit her Etsy shop, she’ll even construct you a pair, for […]
Pingback by Buttoned legwarmer tutorial | diyblog.info — March 18, 2008 @ 10:57 pm
[…] you need it, LauPre has a more detailed tutorial for buttoned legwarmers on her blog… and whether you visit her Etsy shop, she’ll even assemble you a pair, for […]
Pingback by Buttoned legwarmer tutorial | Do it Yourself — March 18, 2008 @ 11:17 pm
Those are perfect…. I love it and I will make one for me 🙂 .
Thanks for the tutorial… Now I know how to do 🙂 !!!
Comment by kawaii_12 — March 19, 2008 @ 12:30 am
[…] has a how-to on how you can make your own sewn ‘legwarmers’…some sassy buttoned ones that to me look more like spats. spats are so, so chic, methinks. […]
Pingback by bits and bobbins » archives » (not so) random links — March 20, 2008 @ 4:35 pm
Could this be adapted somehow to make buttoned armwarmers/fingerless gloves?
Comment by Lana — March 24, 2008 @ 3:59 am
[…] Neat chap-like legwarmers (or at least the pattern for them). […]
Pingback by Just Kristin » Blog Archive » Stuffus — March 29, 2008 @ 7:42 am
perfect, I’ve just written a two part post on ‘the spat’, I’ll be sure to included a link back to this.
Comment by Imelda Matt — May 10, 2008 @ 11:11 am
Love! Clear, simple, but quality instructions and technique. I really like that you add lining fabric to support the buttonholes. Thank you!
Comment by Katyusha — May 29, 2008 @ 12:03 am
[…] Mens secondhand suits make perfect material for clothing reconstruction projects since they are easily available, usually cheap but very good material to easy to sew (most are wool and wool-mix) and work with. I have also made a dress from a suit (+ corset) and found it to be one of my favorite projects. LauPre also has a blog (and Etsy shop). Check out her tutorial on making buttoned spats/legwarmers. […]
Pingback by Suits you Girl! A reconstruction by LauPre — May 29, 2008 @ 10:35 pm
Yummy!
Comment by pennycandy — October 19, 2008 @ 1:46 pm
i love this idea.Thanks for the tutorial
Comment by mikel — December 14, 2008 @ 4:30 pm
These are awesome! gonna link to them from dollar store crafts!
So cute!
Comment by dollarstorecraftsdotcom — January 6, 2009 @ 12:25 pm
[…] Laupre designed these amazing legwarmers using fleece and some big buttons. I love them! They are a great stylish way to keep your ankles warm! For the dollar store version, you could use fleece scarves or baby blankets, or check the tea towel or placemat section for some suitable material to use. The craft section at my dollar store usually has cool buttons, too. Project Estimate: […]
Pingback by Sew Some Buttoned Legwarmers | Dollar Store Crafts — January 25, 2009 @ 8:17 am
Again and again I come back to your blog to be amazed by your awesomeness! I just have to be reminded to delurk once in awhile 😀 Thanks for sharing these- they are going to be the perfect accompaniment to my steampunk Halloween costume!
Comment by hellesbelles86 — October 24, 2009 @ 7:42 am
Fantastic! Thank you so much for sharing this tutorial! 🙂 🙂
Comment by Sally — October 25, 2009 @ 5:15 am
I made some of these for my daughter, they are too cute!! it wasn’t hard to follow your GREAT dirrections and they came out really adorable, thanks for the tutorial! I love em~ I guess I know what all my friends are getting for Christmas now! Thanks~
Comment by Becki — October 25, 2009 @ 12:58 pm
[…] cream, sugar, etc) Basic corset making at Craftster (but theres so much more in this forum!) Button Legwarmers at Laupre More […]
Pingback by Tutorial Link List - Page 2 - AsiaJam Asian Fashion Forums — March 6, 2010 @ 9:57 pm
awesomeeeeeeeeeeeeeeeeeeeeeeeeeeeeeeeeeeeeeeeeeeeeeeeeeeeeeeeeeeeeeeeeeeeeeeeeeeeeeeeeeeeeeeee
Comment by upasana — May 5, 2010 @ 7:47 am