Laupre

July 11, 2011

Super Easy Summer Shirt

Filed under: Projects, Tutorials — Tags: , , — laupre @ 4:44 pm

Yesterday I whipped up this simple top after seeing people wearing similar ones around town.  I thought they looked comfortable and the design is so simple I thought it would be a great project for summer sewing.  I know I’m not the only one who gets busy and begins to neglect their sewing space when the weather gets nice!

click image for full size

click image for full size

It ended up being just a twenty minute project, and it’s as easy to wear as it was to make.  There is no need for a pattern as it was as simple as three pieces, and since I used a knit that’s pretty stable and not prone to unraveling I just left the neckline and sleeve holes unfinished.

click image for full size

To add a little something special to this simple top I put a couple of grommets onto the back and strung some chain I had between them.  (note that I said grommets, not eyelets.  Grommets have two pieces that fit together while eyelets are the just one piece.  It makes a big difference in how well they will stay in place and not get ripped out.  Also, when setting grommets into stretchy knits you want to remember to use a smaller hole than you would with a solid woven fabric)


How to after the break: (more…)

October 28, 2010

Mend It! Replacing A Broken Hoodie Zipper

Filed under: Sewing stuff, Tutorials — Tags: , , , , , , — laupre @ 8:49 pm

Once again I can’t bear to part with a hoodie that still has plenty of good miles left in it but has developed a fatal flaw. This time it’s a cozy oversized hoodie with a busted zipper. I start to zip from the bottom, but I get no zip!

Broken zipper

I think I feel a draft

Once again, it’s time to spend a few minutes and save this sweatshirt. I honestly don’t know what’s wrong with the zipper so the easiest solution for me is to replace it with a new one. I just happen to have one almost perfect in my stash. If you need to buy a zipper, be sure to measure the length of the original zipper as accurately as possible. I suggest taking the item with you so that you can match up the color and exact length before you begin.

matching zipper

New functioning zipper

This zipper is just about perfect. The right length, nearly a perfect match, and was dirt cheap. I bought it locally at Scrap, an excellent resource in Portland, OR for Reuse and Recycling. The other important thing is that it is a separating zipper so the two halves of the zipper separate when the zipper slider is pulled all the way down.

3 zippers

Here are three similar zippers. They are all the same size, all have plastic teeth, the only difference is color and how they end. The first on the left (blue) has a closed bottom. The two sides are connected at the bottom preventing the slider from coming off at the end but it won’t come apart. The middle zipper (green) is a separating zipper. It is perfect for jackets or sweatshirts/hoodies that are expected to open all the way. The one all the way on the right (black) is a double separating zipper. It can come apart like a separating zipper, but it has the added feature of a second slider allowing you to zip it up, then unzip it from the bottom, leaving the top zipped if you want to.

three zippers

Now, back to my project! Looking at the inside of the sweatshirt you can see that this zipper is simply attached with just a single line of stitches.

I could easily pick out the stitches and remove the zipper first. I like to leave the old zipper in place when I add my new zipper for two reasons. First, I like to have the old zipper tape to act as a support layer to keep the sweatshirt material from stretching as I sew, causing wavy zipper syndrome. Secondly, I like to have the original zipper teeth to line the new zipper teeth against as a guide to make sure my zipper is set straight (and make it easier to not use pins. Use them if you prefer.)

Place the zipper, and sew it in place.

I started at the bottom and sewed up towards the hood. Then I stopped an inch or two from the top and hand stitched the rest in place, folding the extra zipper tape from the top between the zipper and the sweatshirt fleece to hide it.

Now I have the option of trimming away the original zipper, if it wasn’t removed before sewing on the new zipper. In my experience it works just fine to trim away the old zipper, cutting as close to the line of stitching for the new zipper as possible. anything leftover is hidden just fine by the new zipper and the edge of the sweatshirt on top. I chose to leave the original zipper in place for this, though. I just like the look of the “double zipper” and the shiny brass of the original.

This is a quick and easy repair that anyone can do. It took me under 30 minutes, including hunting for the zipper! 😉

June 2, 2010

Big Flower Pin Cushion

Filed under: Needlework, Projects, Tutorials — Tags: , , , — laupre @ 10:01 pm

I decided to make a new large pin cushion for my sewing desk. I needed one that was big and heavy, one that I couldn’t lose or knock over accidentally.

I don’t know if I’m the only one who tends to lose things in the midst of a project, but I’d guess I’m not the only one with backups.   I’ve got a selection of scissors, multiple packages of needles, a spare pair of reading glasses, and a collection of pin cushions scattered about. (If however, you’re the kind of person with perfect organization who always know exactly where every supply is just play along for my benefit.)  Besides that, A quick and easy pin cushion project is just the thing for a blah rainy afternoon.

This is the cushion I created.  It’s a basic rectangle shape with a big flower on top.  I made it to fit inside this low, wide planter making it nearly impossible to lose!

After the jump I’ll share my technique for making the cushion and give a tutorial to make the petals for the flower.

(more…)

February 10, 2010

Zip-up Earbuds

Filed under: Projects, Tutorials — Tags: , , , , , — laupre @ 1:29 pm

I love to have my music with me everywhere I go, but I hate the tangled mess my wires become when I toss them in my bag or pocket. Last night I whipped up a fun and functional solution by adding a zipper to my earbuds.

This project took me around an hour to do (perfect for catching up on some t.v. from hulu.com). The supplies are few; basic sewing supplies, a pair of headphones, and a nice long zipper. I happened to have this crazy purple and gold nike zipper I found thrifting a while ago, it seemed perfect for this project.

The first step is to pull the earbuds apart, to separate the wires all the way down to the plug.

Next, take one side of your headphones and one side of the zipper tape and start stitching the wire into the tape. Simply fold the outside edge of the tape under to the wrong side (enclosing the wire) and use a running stitch to hold it in place. A little bit of glue could be used at the top to attach the end of the zipper to the earbud, but I found that it wasn’t necessary for me.

It’s as easy as that! Zipped up, I can toss them into my bag or pocket without worrying about tangles or having them get caught on something and breaking.

Then unzip them to the length I want and put them on so much faster than having to untangle the mess!


October 7, 2009

Quick Cashmere Knee Sock Recon

Filed under: Projects, Tutorials — laupre @ 12:14 pm

cashsocks5

A while ago I thrifted this Cashmere hoodie that was so soft and warm and a lovely grey. Sadly, it was a little small and had a few holes along some of the seams, but I knew it would be great for a recon project. This morning my chilly toes were just calling out for some toasty socks and it clicked, I need some cashmere knee socks!

cashsocks1

I snipped off the sleeves and cut some roughly foot shaped pieces from the hood to make the bottom of the sock. The end of the sleeve with the cuff would become the top of the sock.

cashsicjs2

I lined up the heel of my foot tracing with the seam on the sleeve. The wider toe part of the bottom lined up with the higher part of the sleeve that used to be the top of the shoulder.

cashsocks3

Just a quick stitch around, attaching the bottom piece to the sleeve. Repeated for the other sleeve.

cashsocks 4

Sweet! Cashmere socks for under $5 and in less than 10 minutes.

cashsocks6
The seams along the bottom are very subtle.

July 16, 2009

The Earbud Poppy Laundromat tutorial

Filed under: Tutorials — laupre @ 8:45 pm

I’ve posted before about my laundromat projects, but this time I thought I’d bring my camera along with and share a quick one perfect for your next trip to the laundromat. I was inspired by Diana Eng’s book Fashion Geek available on Amazon. I made up my own pattern for my version, but feel free to check out the book (I saw it at my local library and there seem to be a lot of cute projects in there.)

IMG_7226

IMG_7201

Step 1

First, get your laundry, your quarters, and your supplies and head off to the laundromat. I like to do my laundry at midnight at the 24 hour laundromat when it’s nice and quiet and empty, but that’s optional. The supplies you’ll need are few and easy to tote along with you.
-Felt in two colors, one for your petals and one for your center circle. Scraps are fine
-Scissors
-Needles, thread (I like to carry a mini sewing kit in a film canister)
-Your headphones / earbuds

-*- Optional -*- hot glue or tacky glue
IMG_7136

Step 2

Cut your pieces out of felt. For the petals, cut a strip of felt about 2 inches tall. You don’t really need a pattern to cut the petals, they’re just rectangles with a rounded top. The curve of your thumb should make a perfect template. Trace your shape onto one end of the felt, cut it out, and use that as your guide to cut out 5 more petals for one flower ( 11 more if you want to make two flowers. From here I’ll be describing how to make one flower), all the same size and shape.

IMG_7147

Step 3

With your needle threaded you’re now going to stitch the six petals together.

Holding the bottom of the petal (the flat side opposite the curve) fold the flat side in half. Then fold the edges up towards the fold. Push the needle through the four layers, near the edge of the flat side.

See the image below for a step by step. Click the image if you need to see it bigger.

IMG_7153

It should look like this once you slide the petal onto the thread and release it:

IMG_7156

String the next five petals onto the thread (If you’re making two flowers, string six petals on one thread and six petals on another thread)

IMG_7162

Step 4

Time to check in on your laundry if you haven’t done it yet.

IMG_7177

Yep, Spin cycle. Once your laundry is in the dryer just tumbling away, we’ve got about 20 minutes to finish this up.

IMG_7189

Step 5

Pull the ends of the thread to gather the petals together. Pull it nice and tight and tie a couple of knots to make your flower.

IMG_7164

You could call this done if you like, and sew or glue this onto your earbuds now, but I’ve got a few more minutes to kill until folding time.

Cut a small felt circle of your second color of felt and stitch it to the center of the flower with a matching thread. I used a simple blanket stitch.

IMG_7214

I still had some extra time, so I added some french knots in a contrasting thread color for a little extra bit of detail. On the other earbud I also added a little green leaf underneath the flower.

IMG_7226

Step 6

Attach the flower to your earbuds. I simply sewed around the earbud and through the petals a few times to hold it in place. Alternately you could use glue, or a glue gun would work great. I noticed some open outlets at the laundromat and realized I could’ve brought my hot glue for a quick and easy fix, but this worked just fine.

IMG_7224

Step 7

IMG_7229

Put on your headphones, turn up the tunes, and get that laundry folded!

IMG_7227

April 3, 2009

Mend it! Replacing worn Cuffs

Filed under: Tutorials — Tags: , , , , , , , , — laupre @ 10:54 am

img_4727
I’ve got this old sweatshirt hoodie here that I’ve had for a while. When I took it out of the wash this week I found that my “ok, these are starting to wear out” wrist cuffs had exploded into a huge mess. Tatters and shreds! Instead of just tossing the hoodie out, or cutting it up to make rags, I decided to replace the cuffs with some new material to extend the life of the garment and to fight the disposable everything society that surrounds us. It’s a shame that so much of the clothing that’s produced today are made to wear out quickly and then be tossed away and replaced with new disposable fashion. So I’d like to share with you a quick 10 minute or less solution to worn out cuffs. No worn out cuffs around? That’s okay, too, you can use this same technique to add your own style to your sleeves.

Look at those cuffs!

Look at those cuffs!

The materials you’ll need are few and easy to get.

You’ll  need the shirt you want to mend, fabric for the cuffs, and sewing tools.  The material you use to replace the cuffs should be stretchy, like a knit or ribbing.  Ribbing is the best and is what you will usually find for cuffs and waistbands.  You can tell if a material is ribbed if it has vertical lines,or bumps.  A flat knit material will work, too, and that’s what I’ll be using for this demonstration.  You can get both ribbing and knit material at most fabric stores, but you’ve probably got an old t shirt laying around that would work just as well, too!

A serger can make sewing knits easier and quicker, but for this tutorial you should be able to use a standard sewing machine with a zigzag or stretch stitch with no problem.

img_4744

The stretch in this fabric follows the stripes

You’re going to cut two rectangles out of your fabric, one for each cuff.  You fabric will most likely have more stretch in one direction than the other.  The stretchy direction will be our “width” or the way that will wrap around your wrist.  The less stretchy direction will be our “length” or how long you want the cuff to extend from the end of the sleeve.

img_4737

Marking my fabric rectangles 9"x12"

Here I’m using just regular chalkboard chalk to mark my fabric.  Your rectangles’ width should be about 9″ and the length should be two times the final length that you want the cuff to be.  I decided I wanted my cuffs about 6″ long, so my rectangles will be 9″ wide (stretchy wise) and 12″ long (non-stretch wise).

img_4745

Right sides together

Your first seams will be along the length of the cuff.  Fold it in half with right sides together and sew the fabric into a tube.

Your tube

Your tube

Now start as if to turn the tube rightside out, but you’re going to stop halfway.  You’ll want the raw edges to line up giving you a tube half as long, with both cut ends on one end, the folded end on the other, and the seam you just sewed should be hidden.

line up the cut edges

line up the cut edges

Now we’ll add the cuff to the sleeve.  First cut off the old cuff in a straight line across the sleeve.

Snip

Snip

With your sleeve right side out, you’re going to slip the new cuff onto the outside of the sleeve.  You’ll want the cuff to go on folded end first, so that the cut end of the sleeve matches up with the two cut edges of your new cuff.  You’ll be sewing through all three layers to attach the cuff.

img_4752img_4760

An Important note: The cuff should be smaller than the sleeve it will go on.  You will stretch the cuff as you sew it in place.

Now sew around the edge where the sleeve and new cuff meet, stretching the cuff as you go.  Now pull the cuff down and topstitch the new seam if you wish.

img_4763Repeat the process with your other rectangle of fabric on the other sleeve, and that’s it!

Enjoy your new cuffs and the knowledge that you have given new life to an old garment or just have fun with it and try some fun colors or designs to liven up a boring sweatshirt.

All new funky cuffs

All new stripey cuffs

February 20, 2009

My Almost Pollini Alterations

Filed under: Tutorials — Tags: , , , , , — laupre @ 1:49 pm

poll1Add an Image

There was a discussion thread over on Craftster for doing a sew-along for the Almost Pollini dress pattern available on the Burdastyle website, available here.  The pattern is adorable, but unfortuneatly only comes in a single size, and it’s not quite my size.  I’d been thinking about recreating this dress, though, so when I saw the sewalong I thought it was time to give it a try and share my process for the other ladies who were thinking about taking on the resizing.  The way I did it was pretty easy and didn’t take too long.

I adapted my own bust sloped to fit the style of the pattern, only changing a few things from the original.  Instead of having the neckline facing be one continuous piece, I made the front facing a part of the front bodice piece, and made a second facing piece for the back. To use my version of the bust pattern pieces you can print out these photos on U.S. letter size paper.  This pattern fits about a 38 inch bust, but be warned! I made the original pattern too long. It will have to be shortened to fit the style of the dress. To fit me, I ended up shortening it to  the bottom of the side dart.  It’s an easy fix, just cut along horizontally to the bottom line.

Click these images to view full:

First, how the pages should layout when you’re ready to tape them together:
notes2

And here are the pattern pieces.  There are 8 in all:

pat1pat2pat3pat4

pat5pat6pat7pat8

Each image should be printed as a full sheet of paper.

The Making of: The Almost-Almost Pollini dress

Ok, assuming you’ve already printed out your Burdastyle Pollini dress pattern (I only printed out pages 8-9, and 14-25 since I wasn’t using the original bust and sleeve patterns. you can set that in the print dialogue) and the 8 images above, it’s time to resize the burdastyle pieces to fit the LauPre pieces.  This is really easy, but here are some images of how I did it.

The key to resizing the skirt is to know that the skirt panel seams should match up with the seams and dart lines of the bodice. Here you can see the original burda skirt panel side back, matched up to the new bodice back piece.  The skirt panel should hit the side seam and the edge of the dart.  The long arrow grainline printed on the skirt piece makes a perfect altering line, so cut the piece in two along this line.   Lay the edges of the pattern in place, and use some scraps of paper and tape to create your resized piece.  The yoke pieces will also have to be made to fit the width of the new bodice.

resize1resize2resize3

Remember when you cut out the pieces to add seam allowances to the Burda pattern pieces

laidout

I used 2 yards of fabric for the dress, but it was close.  I would suggest getting  two and a third, or even two and a half so you won’t have to do tricky piece cutting.  I ended up not having enough to double my yoke pieces….

anyway, once you have your pieces it’s really easy to put it all together!

Start with the bodice:

Sew the darts.

Fold the facings at the center front of the bust pieces to the wrong sides of the fabric and press.

sew1

Place the two press lines together, right side together, and sew a line, using the pressed crease line as a guide

sew2

Fold the facing against the crease and stitch along the neckline for each side.  Turn out the corners and press.

sew3

Attach the back facing piece to the bodice back.

sew4

Sew the front bodice piece to the back bodice piece at the shoulders, being sure to match up the seams for the facings.  Press the seam flat.

sew5

Attach the yoke pieces to the front and back.  The original pattern calls for interfacing, so use it if you like. You can see that I cut my yoke pieces extra wide.  I trimmed them after attaching them to the bodice.

sew6

Now add the sleeves:

sew7

Next you’ll make the skirt pieces.  Attach the skirt front sides to the skirt front center and the skirt back center to the skirt back sides.  Don’t attach the front and back to each other yet.  Instead, sew them into place below the yokes, making sure that the seam lines match up with the dart lines in the bodice.

sew8

Match up the right side, from the end of the sleeve to the bottom of the skirt and sew the two pieces together.

sew9

For the left side do the same except add a zipper in at the places indicated on the burda pattern.

All that’s left to do is hem the sleeve and skirt, and topstitch the neckline.

I hope this is helpful, feel free to contact me if you have any questions!

poll2

December 5, 2008

Step by Step; Men’s polo shirt to woman’s cute shirt with yoke

Filed under: Tutorials — laupre @ 5:05 pm

I just posted some photos of my first serger recon, the argyle one, and I got a lot of great comments and a few questions about construction.  I decided to whip up another shirt in the same style and I took photos along the way to share.  Click more below for a lot of photos and a little description to see how I made this shirt, step by step!

(more…)

November 25, 2008

The Big Red Muff Tutorial

Filed under: Tutorials — laupre @ 6:07 pm

_h105025

This is my big, red, muff.  I think the muff is one of my favorite winter accessories. Gloves and mittens just don’t do it for me.  With my muff I can keep my hands warm, and when it’s really cold combine it with a pair of gloves and be extremely cozy.  They’re also great for holding hands! With your hand in one end, and theirs in the other you can guide your loved one and share the warmth.

Today I’m going to share a simple step-by-step tutorial to make a simple faux fur muff, as well as a few tips for working with the material.  This is a very quick and easy project that you should be able to complete easily in under an hour, doesn’t require any tricky seams (just straight stitching) and can be sewn simply by hand if you like.

The first step is always to gather your supplies.

_h104865

You will need your faux fur (availabe at most fabric stores by the yard or by the piece, especially during the colder seasons).  Be sure to pick one that feels good to you.  Quality can vary widely from something scratchy and obviously fake to some that could almost pass as real.  I’m choosing this fun bright red for this tutorial.

Besides the fur you will need basic sewing supplies; scissors, something to measure with, something to mark with (chalk or a marker), thread, and a sewing machine (or a needle).

Before we get cutting into that fur I want to share a couple of tips to get a nice cut with less mess.  Cutting your faux fur is going to be messy.  There’s just no way around it, because when you cut into the fur hundreds or thousands of those little “hairs” are going to come out and scatter.  Don’t cut your fur on carpeting (you will be vacuuming for months), and consider wearing clothing that the fur won’t stick to.  If you don’t want to spend a lot of quality time with your lint roller you will want to cut your fur on wood, linoleum, or tile floors that can be swept easily.  You might even consider doing your cutting outside, and let your furry fuzz become padding for a lucky bird’s nest.
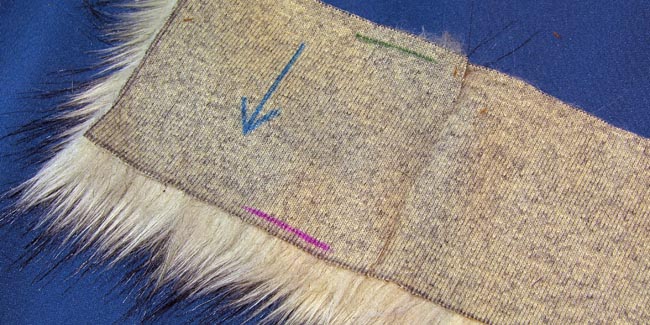
_h104713

Now let’s take a look at your fur.  In the image above we are looking at the back side of the fabric.  You can see that the back is a knit fabric. Fur fabric has a “pile” which means that it has lays a certain way (this is called the nap).  In this image I have marked the direction of the nap with a blue arrow, the top of the nap with green, and the bottom of the nap with purple.  Cutting parralell to the blue line, or with the nap, is pretty easy and won’t produce much mess, but when you must cut across the nap there is the possibility of a HUGE mess.
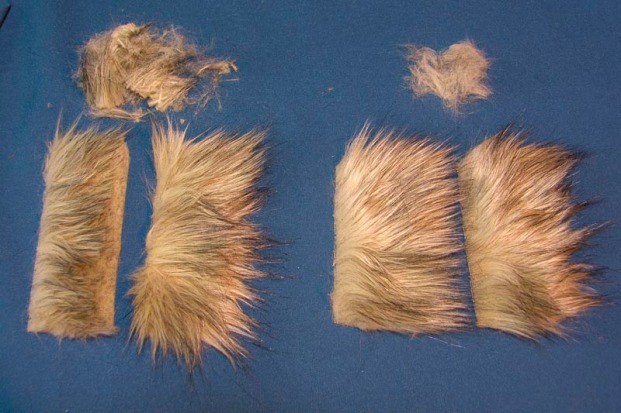
_h104722

This photo shows two sample pieces of faux fur that have been cut across the nap and their resulting piles of fluff.  On the left, the fur has been cut the same way you would cut any thick fabric, cutting straight through the fur and the backing.  You can see that the edges on one side of the cut are ragged and that the fluff ball is about 3 or 4 times bigger than on the right. If that much fur came off of a piece that is just a few inches across, you can imagine how much fur will fly when you cut a piece for a larger project!   The piece on the right was cut carefully by slipping the edge of the scissors up into the fur, and cutting just the backing with little “snip-snip” cuts.

illusHere’s my attempt at a cutaway view of this technique.  The tip of the scissors should stay against the backing the whole time, just sliding through the fur, while the underside of the scissors move up and down.  It will take a little bit longer, but trust me, the time spent cutting this way will save you hours of fur clean-up afterwards.

_h104869

Now that you know a little bit more about faux fur and how to cut it, let’s cut our fur into a piece that is 16 inches by 24 inches.

My 16 inch side goes with the grain, and my 24 inch side is cut against the grain.  This will produce a muff that will have the nap of the fur wrapping around the muff.  Cutting it the other way will have the fur pointing to one side.

With you piece cut we will begin to sew. Fold your fur in half, with the right sides together.  Match up your 16 inch sides and sew a seam along the edge to make a tube. Turn it right side out.

_h104871_h104873

Next, We will begin to turn the tube back to inside out, but stop halfway.

_h104874

Start like this, and continue until the two raw edges of your tube are lined up.  If you notice that, like my tube, your ends are a litte uneven just trim it up.  Fur loves to slip and slide under the presser foot!
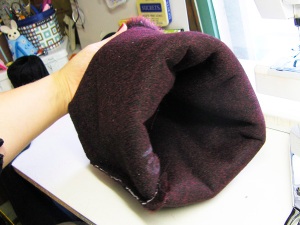
_h104876_h104880

This is how it should look with the raw edges together, right sides inside.  Next, sew around the tube, at the raw edges, but leave a generous hole to turn through.

_h104884

Finally, Turn the tube right side out and hand stitch your turning hole closed.  Use whatever stitch you like.  The pile of the fur will hide the stitches, so it doesn’t even have to be perfect or pretty.  Just get that hole securely closed.  Now the final shape of your muff is complete.  I like to turn the tube to hide the first seam we sewed into the inside of the muff.  To free the fur that is trapped in the seam, just use a needle or other small, pointed object and run it along the folded down hairs.  It should be easy for you to release most of them easily, then fluff with your hands to help hide the seam.

_h104888

And that is the end of the tutorial.  Easy, wasn’t it?  Enjoy your muff for it’s fabulous ability to keep your hands warm, and as a way to honor the elegant fashions of the past.

_h105010mufflady1

Older Posts »

Create a free website or blog at WordPress.com.